Chevy Volt”age” Battery Backup
No one likes to lose power at home or work, and here at PAM’s with all the technology we use daily we must be online 24/7. Strangely we are between two of the substations feeding the St Cloud metro area for
Xcel Energy and
Stearns Electric with multiple direction high voltage feeders, but alas, we commonly have power failures. They are never long term, in fact it is more common for our power to “blink”. I can assure you nothing makes an electronic device madder than a nest of hornets being used as a soccer ball then to flip the power on and off multiple times in a few seconds. We have lost Wi-Fi access points, network switches, and PC’s to this over the course of years.
We were lucky enough to have wired out main offices back in 2004 when we built with separate circuits. If you look at our wall boxes they are all four gang connections and half are grid power and half are line conditioned with battery backup. In our server room we have equipment to supply up to 20Kw of power from battery when the grid goes blackout, brownout, or even over-voltage! To power this, we have used a 48 VDC forklift battery for years. This worked great for us as when we have long term outages, we could just drive a forklift close to the server room and hook up the backup system to the forklift battery as all our forklifts are 48 VDC. We have enough forklifts on site to do this for over an entire workday, and have had to use it for six hours during one outage.
Recently the battery in the server room reached end of life and needed to be replaced. Spending $5,000 on a new lead battery seemed to be in our future until a morning manager’s meeting included this one phrase. “What do you want us to do with this damaged volt battery, we can’t sell it due to case damage”. There is was, the power storage we needed and basically free. We just needed to somehow get a 350+ VDC battery to play friendly at a lower voltage.
To start the project, we needed to find out the minimum and maximum voltages the battery backup unit could handle and still provide power. We started with the manufacturer and they would have no part of giving out these specs, they were confident that if you hooked it up to the batteries they supplied it would work, but any other batteries would fail. I guess their 48 Volts just must flow better than the 48 Volts that the rest of the world uses! The next step was to wire up a mock circuit with a spare battery backup unit to test what the max and min voltages are the hard way. Max voltage was easy, we just hooked up a constant amperage power supply with adjustable voltage and cranked up the volts till something happened. 58 Volts later the battery backup is screaming “Battery Over Voltage”. This voltage makes sense if you know what a 12 VDC lead battery really has for voltages.
Min voltage was not much harder to do, we hooked up a small collection of electric heaters that employees have brought in to heat their work space when winter comes around and the wind just makes balancing heat in the building a challenge. We connected an array of car batteries in series at 57.6V to start (4 batteries fully charged) and ran the backup till it cut out. We used a graphing volt meter and repeated the test a few times. 43 Volts was the number that the cutout happened, but I couldn’t be sure if that was a voltage cutout or amperage as that is the voltage of a full discharged lead acid battery.
I needed to dig deeper and figure out what was the real cutout. We had to go off normal voltage specs and ditch the lead batteries. We grabbed a stack of Prius cells and charged them and arranged a few different voltages. After a few tests it turns out that 38 VDC was the real cutout voltage.
Now it was time to dig into the Volt battery. Some quick online research showed that the entire battery is made up of 9 smaller batteries. Seven of them are 12 cell units and two are 6 cell units. Researching online was getting tough as depending on the chemistry of the cells the fully charged voltage would be between 3.7 volts and 4.1. I love how engineers like to just do what is comfortable, that’s around 48 VDC, and plenty close for this game of horse shoes.
From here it seemed like a quick sprint to the finish and we would be done. Turns out that was not the way it went at all. We would need to maintain a charge on the batteries and the charger on the battery backup was happy to push out 57+ volts if you asked. That sounds like a Li-ion battery barbeque in my book and not what I want next to my server rack! I found many chargers that we could have used to charge and maintain the cells, but I was still concerned that it wasn’t safe enough.
Charging Li-ion batteries is about as simple as it gets. You choose the voltage you want at fully charged and just apply it. They don’t need an over voltage charge like lead or a lower float voltage. You can charge them faster by over voltaging them, but that is just not needed for our project. If a recharge takes a few days, so be it.
I still was concerned about short circuit amperage though. We decided to get 12 cell battery management cards that were current limited to 60 amps and install one on each battery bank with a 100 amp circuit breaker. I never could find specs on what short circuit amps the cells in a Volt battery would put out. I was lucky enough during final assembly to witness first hand the discharge capabilities these cells have. While tightening down a connector the extension I had on my ratchet fell of and shorted out across 4 cells (16 volts). The 12 inch long 3/8 inch extension jumped off the battery at least 2 feet in the air, with sparks flying everywhere! Nearly unlimited discharge amperage verified and one extension is scarred for life and the battery terminals have a fancy half-moon cutout too.
We never gave consideration to cooling the batteries. There is no plan to fast charge the cells, so we only must account for the heat from discharging from a full charge to empty at a 60 AMP rate. When doing these tests we saw less than a 20 Degree F rise from the temp sensors that were put deep into the cell stack. That was no concern as the batteries are maintained at 76 degrees in the server room.
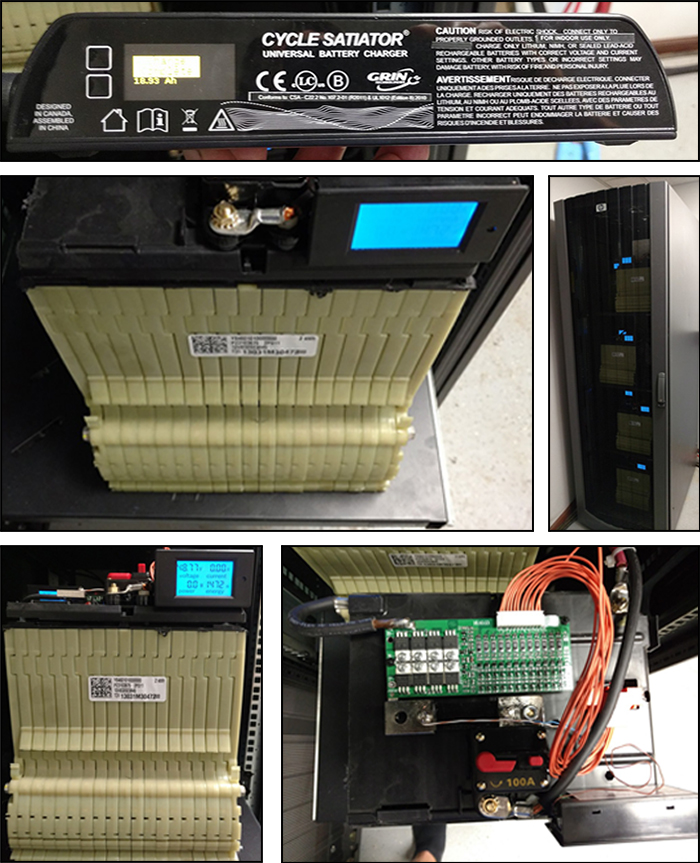
Final assembly included splitting the entire battery into each smaller 12 cell stack and joining the two 6 cell stacks to a 12 cell. The cells are crimp welded together in their stacks, so if you want to do anything not 48 or 24 volt based you have some work cut out for you. We reused the covers that were on the cells from GM and attached the BMS ECU to each unit and wired up everything. I installed a voltmeter/amp meter on each battery to enable quick diagnostics as needed.
We decided on a
Cycle Satiator charger from
ebikes. I had emailed multiple vendors and they were the only company to respond. They were very helpful. That is total pet peeve of mine when a company has a contact us form and they ignore their customers. The unit puts out 8 amps so a full charge takes about 1.5 days.
The entire unit is in a 42U rolling rack that we scored off craigslist for dirt. It is way too much space and if we get another damaged volt battery in I probably will fill the rack with it.
Backside wiring is somewhat secret. If you want to do project like this, you need to know how to manage high amperage power to be safe. We designed a special circuit to enable the battery charger to charge the cells in parallel but not allow cross cell stack voltage leaking. All the wiring is balanced and amp tested under load to confirm.